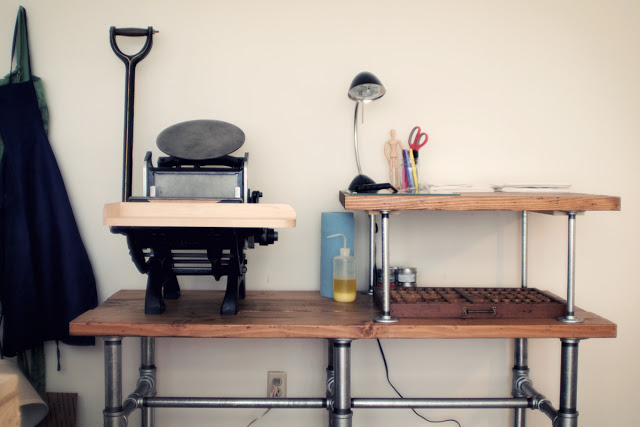

Ever since Jamie and I got our letterpress, it has been sitting in the middle of our living room floor. We didn’t have anything to set it on because, after all, it weighs 250lbs. Believe me, we looked all over the place for something that would work for us, but there were some key requirements. First and foremost, it had to hold the weight. It also needed to have a top that we could drill through to bolt the press down. And we had to make sure it was a height that wouldn’t be out of reach (for Jamie). We never found anything that fit all of those requirements, and even the ones that met some were more expensive than we were hoping for. So being our creative selves, we decided to figure out how to build one. Jamie came across this post on how to build your own dining table out of galvanized steel pipe. As soon as we saw a picture of the table we knew that it would be perfect for making a custom press table. It’d be more than strong enough plus we’d be able to configure it to the exact height we wanted. Originally we were basically going to just make a stand for the press to sit on, but then we realized we could make it larger and have more of a work table too. The design was really easy to modify. We had so much fun building it, and it was so easy to do that we thought we’d make a little tutorial for anyone who could use it.

Supplies:
2 – 24″ pipe
6 – 1-1/2″x12″ nipple
6 – 1-1/2″x9″ nipple (not pictured)
4 – 1/2″x12″ nipple
6 – 1″x8″ nipple
8 – 1/2″ flange
12 – 1-1/2″ flange
2 – 1″ tee
6 – 1-1/2″ tee
6 – 1-1/2″ to 1″ bushing
1 – 1″ cross
3 – 2″x10″x5′ wood boards
3 – 2″x10″x30″ wood boards
4 – 1″x4″x20″ wood boards
We bought all the piping at our local hardware store. We found that Home Depot was charging almost twice as much. So be sure to price out a few store before buying.
Now for the fun part!

Assemble each leg of the base by using one 12″ nipple, one 9″ nipple, one 1-1/2″ tee, and one bushing.

Use the bushings to connect the 1″ nipples to the 1-1/2″ tees. The 24″ pipes run along the length of the base and connect in the middle with the cross. You’ve finished the base!

For the top of the table, lay all three 5′ boards on a flat surface. The side you want facing up on the finished table should be facing down for this step. Lay two of the 1″x4″ boards perpendicular to the 2″x10″ boards with enough clearance for the base’s flanges. Put two screws per 2″x10″ board into the 1″x4″ boards. That’s a total of six screws per 1″x4″. Follow the same steps for the second level of the table with the shorter 2″x10″s.

We found it much easier to attach the base upside down so that the screwing would be downwards. Be sure the base is upside down and center it on the top (use a tape measure!). Screw the flanges to the top – four screws per flange. Do the same thing for the top level, and you’re almost done!

Since we were bolting our letterpress to the table, we drilled four holes in the top for bolts. Then we attached the top level to the main level.


We stained and sealed our wood to make it look a little more finished. If you’d like to do that too, follow the directions on the can. And just like that, you’re done! I hope you enjoyed it. As I’m sure you can see, using galvanized steel pipe makes this type of table extremely customizable. If you have any questions or need clarification, we’d be more than happy to help. Just leave a comment and we’ll get back to you as soon as we can.