I had a lot of fun planing and putting together stuff for my vintage birthday party. There were so many of you that said how much you liked the post about my party a few days back so I thought I would share with you some of the things I did. That way if you ever have an urge to throw a vintage party you can plan one too!
- Cake: We made a delicious snickerdoodle cake with brown sugar buttercream
- Food: Watermelon and button butter cookies
- Drinks: Pop in glass bottles
- Party Favors: Mini Journals
- Decor: Bunting cake topper, vintage tins & crates, paper straws, quilted picnic blankets
- Games: Croquet, ladder ball, horse shoes, and bocce
If you missed the post of all the pictures and video from the party you can see it here.
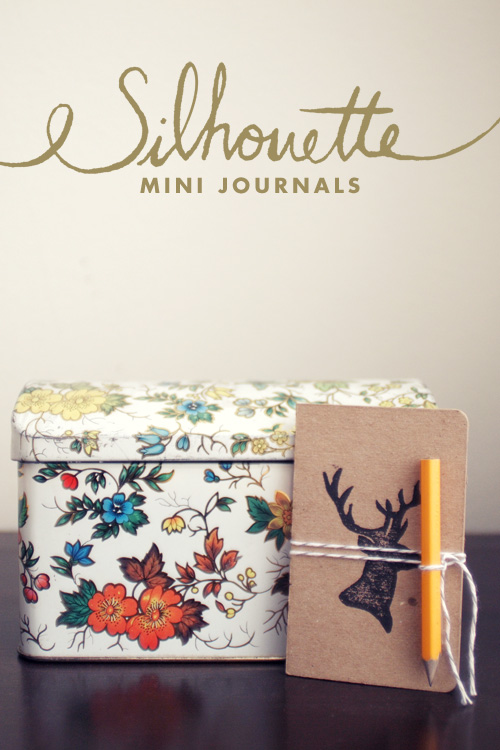
For the party favors we made mini journals with animal silhouettes handprinted on the covers. I did three different animals: a rabbit, bear, and deer. Heres how you can make your own.
Supplies:
- Pencil
- Scissors
- Paper
- Compressed cardboard or heavy paper for the cover. (I used some cardboard that was used to keep a picture I ordered from bending in the mail.)
- Linoleum
- Linoleum Cutter (this is the one I have)
- Brayer
- Block printing ink
- String
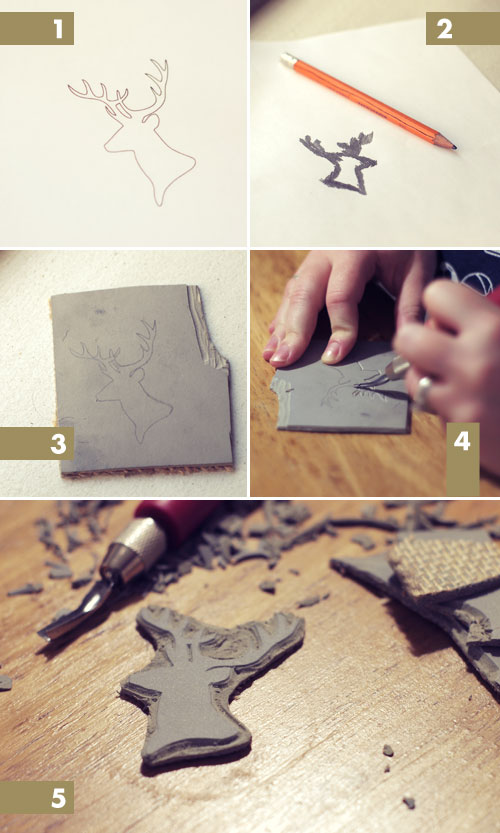
Step 1: Print your design out backwards on a piece of paper, or you can just draw your design right on the linoleum (if you do that skip to step 4).
Step 2: On the opposite side of the paper, scribble over the design with a pencil to create your own carbon paper.
Step 3: Place the paper scribble-side down on the linoleum and trace your design with a pencil. Use a lot of pressure in order for the design to transfer well.
Step 4: Now it is time to start cutting. You want to cut away all the linoleum around your design. That way the design is the only thing that gets inked. I like to start with the smallest blade and go all the way around the design. Then I switch to a bigger blade and cut out large portions at a time.
Step 5: Once you have cut around your design take a pair of scissors and cut as close to your design as possible.
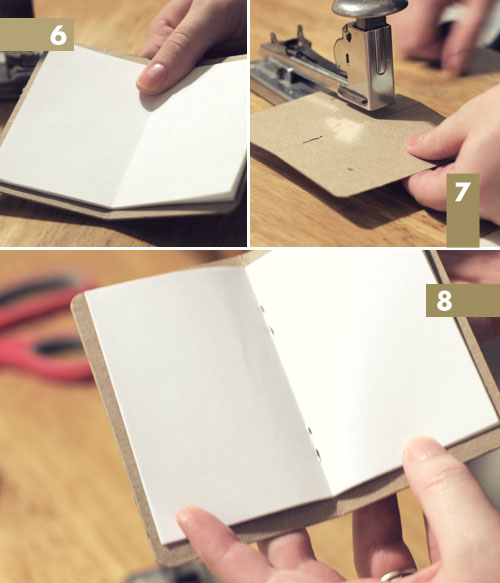
Step 6: Now we need make the journal. Cut a 5″x 4″ piece for your cover. Lightly score where you will fold the journal in half. Then cut 8 sheets of printer paper to 4.75″x3.75″ for the inside.
Step 7: Stack all the sheets up and center them in the inside of the cover. Turn it over and staple in two spots.
Step 8: Carefully fold the journal in half using the scored line as a guide.
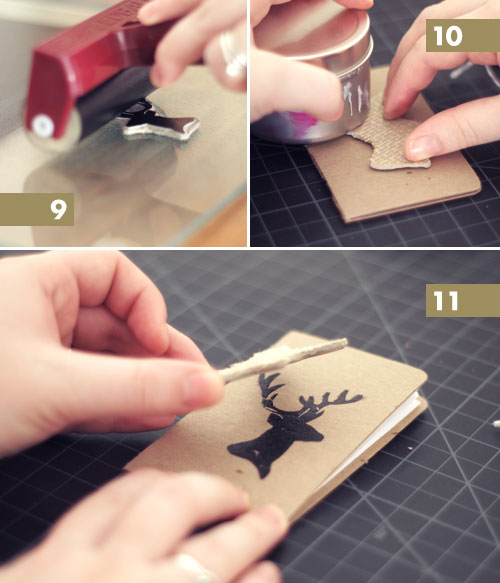
Step 9: On a smooth surface (I use a glass cutting board) roll your brayer in ink until it is evenly covered. Then ink your design. Try not to put too much ink on the linoleum or else your print won’t be clear.
Step 10: Put the inked design face down on the cover of the journal and use something with a flat bottom to press the design. Keep going over it until you feel like you have gotten it pressed evenly. You can even take a peek underneath to see how it is printing. If there are un-inked areas keep pressing.
Step 11: Take off the linoleum and let dry for a few hours. Then wrap with a pencil and string!
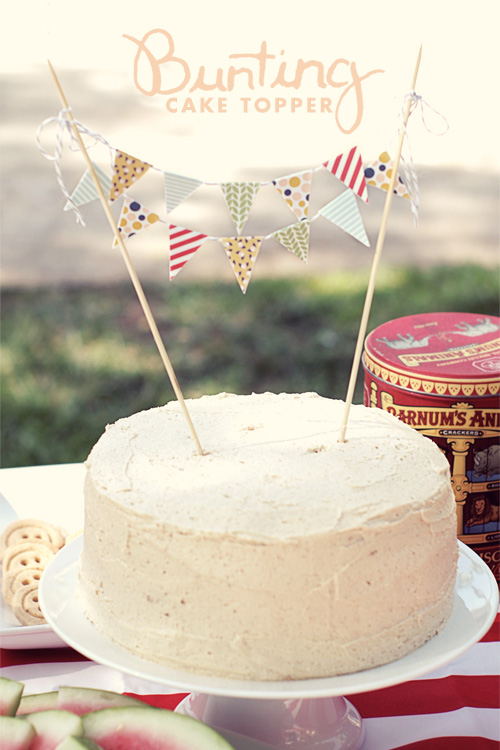
The cake bunting is really easy and adds a nice touch to your cake.
Supplies:
- Xacto knife
- Ruler
- Wooden skewers
- String
- Double stick tape
- Bunting design

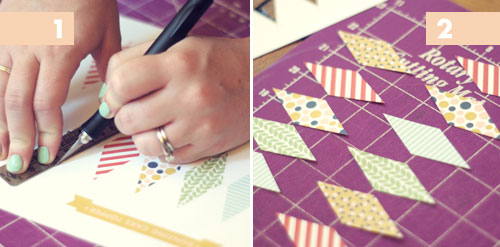
Step 1: Once you have downloaded and printed the design, take a ruler and xacto knife and start cutting out each flag.
Step 2: Continue until you have them all cut out.

Step 3: Take the skewers and tie string in between them the distance you want.
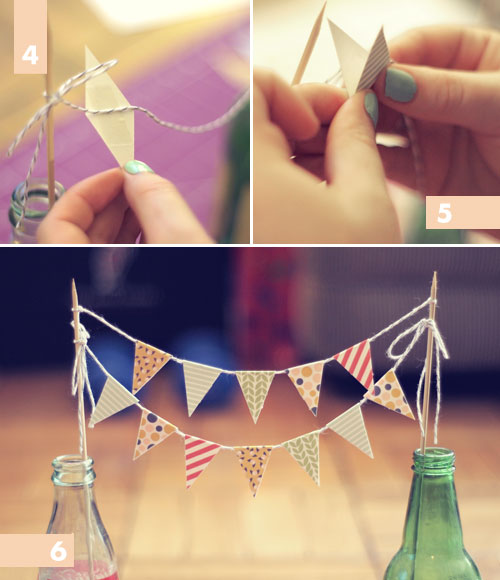
Step 4: Lay a piece of double sided tape on a flag and place the string down the middle.
Step 5: Fold the flag in half over the string and press the two sides together.
Step 6: Continue adding more flags until the string is full. You can also add another string above the first one and fill with even more flags!
I hope you enjoyed these tutorials! If you decide to use them we’d love to hear about it. Send us an email at hello@apairofpears.com so we can see how it turned out!